I first reported on our rainwater catchment endeavors back in February of 2009. That post had a lot of good details and references for getting started, but we've learned some things along the way and have settled on an improved method for converting and connecting barrels.
Our original approach involved cutting off the tops of the barrels, primarily so we could access the inside more easily. The advantages were that we could clean the insides more easily and install the hose bib more securely. The big disadvantages were that the barrels lost some structural stability (particularly when full), were harder to keep mosquito-proof, lost some capacity, and were not easy to link together.
Our original approach involved cutting off the tops of the barrels, primarily so we could access the inside more easily. The advantages were that we could clean the insides more easily and install the hose bib more securely. The big disadvantages were that the barrels lost some structural stability (particularly when full), were harder to keep mosquito-proof, lost some capacity, and were not easy to link together.
Also, that approach was more work, involved more parts, and was therefore more expensive. Cutting the tops off and getting a nice clean cut was fairly challenging, even though it got a little easier with practice. Not having the most secure top meant we needed an overflow valve in the main part of the barrel. We also spent extra money piecing together washers and makeshift nuts to secure the hose bib from both sides. And then the nuts ended up rusting.
Back to the Drawing Board
I ended up going back to a very simple approach we had rejected early on: simply drill a hole for the hose bib and screw it in. We had been concerned that the connection would leak or wear over time. I've now converted six barrels with this approach, and I've only had one problem. One has a very slow leak that I'll patch once it's empty. Otherwise, I'm much happier with the new approach.
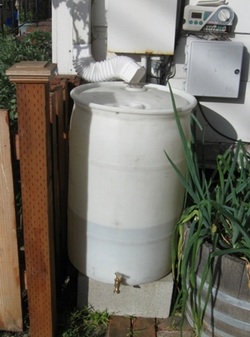
Here are the specs: I drilled a 3/4" hole as close to the bottom of the barrel as possible and screwed in a 1/2" male hose bib. It's a little hard to start screwing it into the hole and you have to be careful to get it in straight, but once it's in it should be pretty secure.
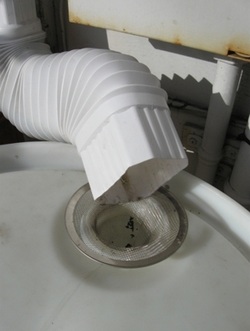
I also found sink strainers that insert snugly into the barrel openings. They strain out leaves and other gunk, while keeping bugs out.
So that's it.
It actually takes me more time to wash out the barrels beforehand than to convert them. That's because while the car wash soap and tire dressing is labeled as being "safe for the environment," I've been pretty particular to make sure none of that drains into groundwater or the bay (since we do live in Alameda). So with each rain barrel upright, I spray the insides with a hose nozzle through one of the top holes. I empty the barrel into a bucket and the bucket down an inside drain. Rinse, repeat. Rinse, repeat. Actually, the 30-gallon barrels fit in my bathtub so it was very easy to clean with a hand shower spray.
Linking Barrels
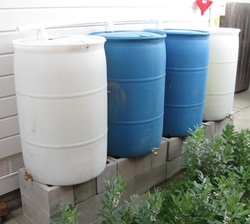
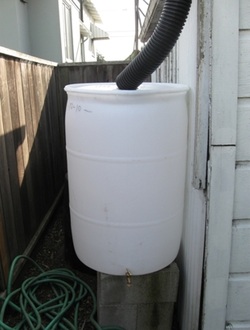
I was interested in filling more than one barrel from a single downspout from the beginning, but couldn't figure out a good approach. One of our downspots with the greatest volume output is located at the back of out driveway where there was unused space that was perfect for lining some barrels up.
I was interested in filling more than one barrel from a single downspout from the beginning, but couldn't figure out a good approach. One of our downspots with the greatest volume output is located at the back of out driveway where there was unused space that was perfect for lining some barrels up.
The biggest problem was just a method for connecting them. I read through a number of approaches published online, but none of them were very appealing. They were either more complicated than seemed necessary, or had other downsides.
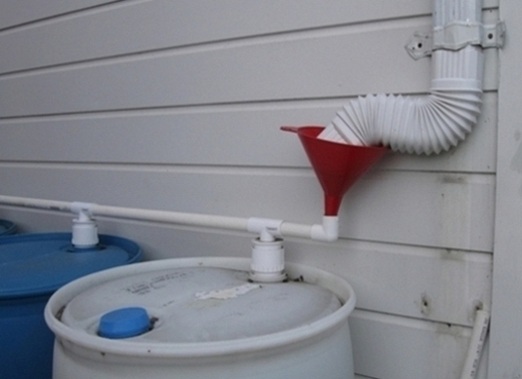
The breakthrough I had was finally finding an adapter that would screw into the (unusually-sized) holes in the tops of the 55-gallon barrels. It is a 2 inch PVC Male Adapter that converts to more standard PVC piping sizes. From there you can reduce down to the size of PVC piping you want and connect up the pieces. I just snapped them together so I can easily remove the piping to clean it or a barrel later on.
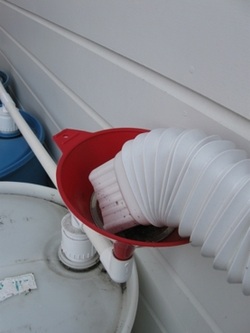
The downspout drains into a funnel, which I nested a sink strainer in. Each barrel has its own hose bib, so it can be emptied independently.
This approach means that we can fill the barrels above the normal fill line, fitting about 65 gallons into the large barrels. So we now have about 360 gallons of capacity!
The breakthrough I had was finally finding an adapter that would screw into the (unusually-sized) holes in the tops of the 55-gallon barrels. It is a 2 inch PVC Male Adapter that converts to more standard PVC piping sizes. From there you can reduce down to the size of PVC piping you want and connect up the pieces. I just snapped them together so I can easily remove the piping to clean it or a barrel later on.
The downspout drains into a funnel, which I nested a sink strainer in. Each barrel has its own hose bib, so it can be emptied independently.
This approach means that we can fill the barrels above the normal fill line, fitting about 65 gallons into the large barrels. So we now have about 360 gallons of capacity!
One other note: we mostly have white semi-opaque barrels, but have two blue ones. We had read that an advantage of opaque barrels are that there is less concern with algae growth. The disadvantage is that you can't see what the water level is. We haven't had problems with algae and now have a clear preference for the white barrels.
 RSS Feed